The Girls

LW DT photoHey ladies and gents and fellow crafty people!!! Sherry here with some more crafty beauties:)

This summer was filled with amazing things and SO many memories!! Not only did I get married but two of my best friends also got married! Between the three of us we have had a busy few months!! Along with these memories came some amazing photos! This layout was inspired but a pic taken at one of the stagettes! It’s so nice to be able to get all dolled up and go out with the girls from time to time! And to take a pic of two!! Love these moments, and I love that they will be remembered because I chose to take the time.

Challenge you to do the same! take a photo, a memory and make sure they never get forgotten! it doesn’t matter if you scrapbook, do mixed media, do a journal, make a photo album or make memory planners. All that matters is that you don’t let the little moments get forgotten, sometimes they’re just as important as the big moments!

Once the creativity started to flow I knew this pic and my thought process matched Limor Webber Designs, Lindy’s Stamp Gang sprays!!!

The full image!

DSC_0017_1

And a few fab close ups!!

DSC_0021_1DSC_0020_1DSC_0019_1

Thank you so much for popping in and checking out my latest tutorial and hopefully you will go and make memories and find your way to remember them!!!

For more products, projects and sneak peeks from me head over to my Facebook and my Instagram page!

For the full tutorial and supply list, head over to the Limor Webber Designs DT inspiration page!!

161c6-watermarklimorwebber


Wonder

161c6-watermarklimorwebber

sometimes when i sit back and i think of life i wonder. i wonder how i got where i am, how i got the courage to work as hard as i do. i wonder how i got lucky with some of the things/people that have come into my life at the right time. i am just full of wonder, and this project depicts my wonder. the look on my face and the tones of the photo are all things that make me feel the wonder of my life.

Without making you wait any longer, here are a few sneaks and close ups of this tutorial of wonder:)

LWOctCloseup2LWOctCloseup3LWOctCloseup4LwOctCloseup5

For the FULL project and tutorial, plus the supply list head on over to the Limor Webber DT blog! While you’re there make sure to check out more inspiration from the other amazing DT ladies!! and be sure to pop into the shop and check out the relish goodies available to be shipped anywhere in the world!!

For more from me head over the my Facebook page to stay up to date with my projects and tutorials!!


love and happy.

Lets get this party started with a little bit of love for the ‘Sirena’ stamp and a fun candid picture form a fun weekend with our niece! I have to start by saying this is my favourite stamp from the last release and I don’t think I would be able to stop using it!!! So she will be my girl for this one:) So head to your stash, pick up a few fave supplies and lets get creating!!

Step 1

BGSeptPic1
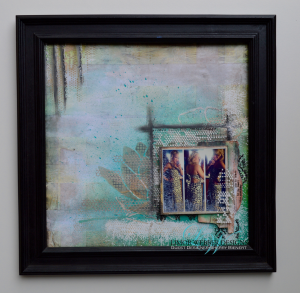
Once deciding where I would place my main image, I decided where my stamp would be placed. (they would go in the top left section of the layout.) So that’s exactly where I started, with a stamped image of ‘Sirena”. (tip: make sure to use a stamp pad with ink that won’t react with whatever sprays you use to maintain a crisp clean image)

I applied Golden fibre paste through a stencil peeking out around where my photo would be, and overlapping a bit of of the stamped image. I also applied some stencilling in the bottom right corner as well. Allow to air dry.

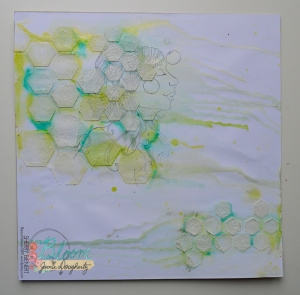
Select 3 co-ordinating spray colors and unscrew their tops off. Spray the stencilled areas with water. While the page is still wet use the ‘straw’ part of the sprayer and drag it along the edged of the paper and raised stencil areas. Dip the straw into the spray as much as needed to add more color. I made sure to apply all three colors together, while everything is still wet. I tilted the paper to allow for some beautiful drips. This also allows them to slightly blend together.

Step 2

BGSeptPic2

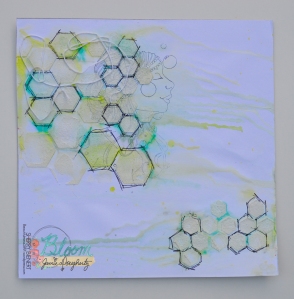
To add a few details and enhance the stencilling from the previous step I messy sketched around the shapes with a permanent thin sharpie pen. I really love the look of a messy outline look!!

Behind where the focal point/photo will be I arranges some thread to peek out from behind the photo.

Step 3

BGSeptPic3
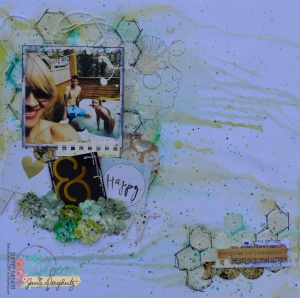
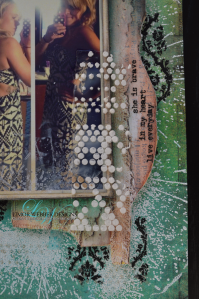
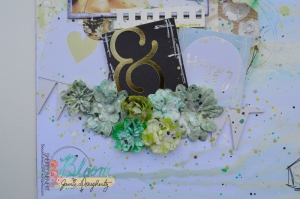
Next up, arrange all of the goodies I have pulled out. These embellishments were super simple but effective to the layout and photo:)

I started with an assortment of white flowers. I sprayed then with the same spray colors from step 1.

A few tags, some scrap holes I cut off of watercolour paper pads and some flowers and I was set! I had a few leftover project life cards with the perfect sentiments for this layout!!

So the layering started, I made sure to arrange everything and generally lay it out before adhering anything down to make sure it looked good before making it permanent.

Once all of the embellies are stuck down and dry, I places a piece of scrap paper over my photo and took the same colors from Step 1 and splattered them over the stencilled areas… Then to tie it all together I added a few splatters of white gesso:)

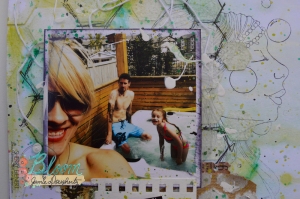
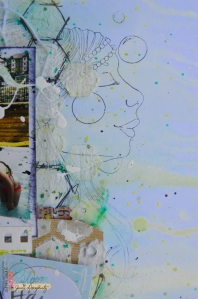
And a few close ups!!!

BGSeptDetail3

BGSeptDetail2

BGSeptDetail1

The thing I love the most about this layout is that it doesn’t need a ton of supplies to create!!!!
Thank you so much for popping in and checking out my first layout back:) For more from me pop into my Facebook for more tutorials and product reviews and all things crafty! Also be sure to check out the Bloom Girl blog for the full supply list to be further inspired by the rest of the amazing DT!

BloomGirlWatermark


I’m back!!!!!

Here are some promised peeks at my lovely wedding. I am obviously bias but I am 100% in love with every piece of our wedding and the decor. 

Here are a few beautiful piece from the wedding that I have till I have proper photos:)

For some reason I felt my cake/cupcake table had to be a beautiful display instead of just a  small table in the corner with no focus! So here it is!!! I LOVE IT!  
    
 
Then my guest book/display table<3


And the candy bar!! Yum yum


Oh and who could forget the guest tables and head table<3 ahhhhh love


Thank you for taking a peek into me mind and my dream for my wedding ❤ this is where my focus has been:) so thank you for your patience and be prepared because I am back!!


Freedom

Hey all my crafty friends, today i’m here with a splatter filled layout that I had a lot of fun making!

Sometimes we forget that many of our supplies have multiple uses and can be out to work on more projects! I also HATE cleaning up my workspace so i tend to get creative and use what’s already out!!  So pull out a few sprays and grab whatever embellies you have in your reach and create with me!! (for full supply list check out the Limor Webber Designs DT blog)

 Step ONE

I selected a soft neutral background, this is important so that my color sprays will stand out. Then I pulled out my variety of sprays and unscrewed all of the tops. I lightly spritzed the page with water to damped the page. (hint:this is important, if you dont pre-moisten the page the spray will instantly soak onto the fibres of the paper and not work as well for this technique)

Then, I dipped the ‘straw’ of one of the tops into its spray bottle and tapped the liquid onto the sections on the page where I wanted. ( I have already determined where my focal point would be)

I continued this between all of the colors will i felt there was enough on the page, then I picked up water with a dropper. And tapping the end of the dropper I created a bit of water splatters over the already placed, not yet dry, color splatters. Allow this to dry.

Step TWO

Next up are the AMAZING and NEW large industrial stamp set. Once I knew where my photo would be I ‘hung’ lamps and chains so the would peek out and show around the edges of the photo area. i did some in black ink and some in IndigoBlu Mega Flake metallics kit. (This starter kit is one of the most amazing little gems in my stash right now… if you don’t have one or haven’t heard of it you NEED to check it out! You’re welcome!)

Step THREE

Since I know where the location of my photo and embellishments are going to be situated, I spread glass beads along a few of the edges and on some of the corners. Once it was dry I used my finger to press clear gesso onto the clear beads. This will create a great base for my Magicals to stick to. Allow gesso to dry.

I pulled out a couple magicals that match (or closely match) the splatter colors and sprinkled them one at a time onto the clear beads and sprayed them with water. I kept layering these colors till they were just right!

Then with a bit of liquid glue I adhered some bundles of thread!

Step FOUR

I splattered a few tags with the same colors as the background and along with a few other embellies I had kicking around on my workspace I created a layered stack of deliciousness! I like to use pop dots when I create these layers and they will make things more dimensional and stand out.

Using the same Mega Flakes metallic kit I applied the word ‘Freedom’ to the bottom left corner.

Step FIVE

I found that the word I put in the corner of the layout didn’t stand out well enough so I use sticker letters and repeated the same word, overlapping the slightly.

Pop the layout into a frame and Ta-Da, it’s ready to be displayed!!

Now for a few close ups to check out the details a bit better!

 Thank you so much for stopping in and I hope you enjoyed my slice of heaven.  Creating should make you feel happy, it should make you feel like you’re leaving a little piece of you on the project. It doesn’t matter how you create or what you create, what’s important is that you create.

Take a few minutes to check out my Instagram and Facebook for more sneak peeks and upcoming tutorials!!

And don’t forget to shop, I promise it’s ok!!!


Please excuse me!!

ok so I am normally pretty good at getting a few posts out a month but this month has been ridiculous! I am GETTING MARRIED!!! I have four more sleeps till i become a wife!! 

So all my crafty time has been spent making some pretty awsome decor for my wedding!!! I am in love with every piece because all my time has been put towards this! So unfortunately I haven’t been doing to many projects!! But I promise that the photos that come from this wedding will inspire some amazing projects to come!!! 
Here are a few sneak peeks of projects made for my wedding!!!


  Thank you for your patience!! I promise more is coming!!!! 


love and kisses

Todays sneak peek is brought to you by the ever amazing Bloom Girls. This was one of those layouts that started one way, then I hated how it was turning out, so instead of throwing it out I salvaged what I loved and finished!! This is exactly how I like tp look at things in life… things may not always be perfect, or turn out how you want it to, but theres always…. ALWAYS a good part that can me held onto and rebuilt on!

So, here are some sneak peeks at what the full project will look like. Check out the Bloom Girls blog for the full tutorial and supply list.

BGcolseup2BGcloseup4BGcloseup3


Thank you for stopping in! And make sure to check out my Facebook and Instagram for more sneak peeks and tutorials!!

xoxo


‘Live Everyday’ Limor Webber Designs GDT

This is my second GDT project for the amazing Limor Webber Designs! I must start with how honoured I feel to be a part of this team. I have felt my creative mind grow and become inspired:) I have had the chance to work amongst some talented women and have had the opportunity to work with amazing product! I feel like this is just the beginning for me:) 

This project shows my love of stencils:) sometimes I think that we don’t use stencils to their full potential so I hoped to use them in a few different ways, with a few different mediums!! Head over to the Limor Webber BLOG for a full how-to tutorial! 


Sketch #144

So there’s no I secret I love sketches and I love my dog!! So here the two worlds collide!! 

With a ton of layers and texture this little baby came together perfect:) I love some textured mixed media any day of the week!!! 

So here is the fab inspiration!!!

  And my fun little spin on it all!! sketch144

And a few close ups of this beauty!DSC_0780_2DSC_0779_2

To check out the rules and guidelines check out the Sketchabilities DT blog! (http://sketchabilities.blogspot.ca/?m=1


Cherish, Mixed Media Layout

There are times in your life that you realize that sometimes you don’t cherish the moments you should… Recently a beautiful woman had a huge loss in her life and it made me realise that I wasn’t taking people in my life for granted but maybe I just wasn’t cherishing moments like I should. that I should live each moment as it is and not think so far ahead. enjoy the now.

with that being said, my brother is one of those people, I don’t take him for granted. I know exactly how luck I am and how much I cherish the relationship we now have as adults. But, I have never documented out moment or out relationship, so what better time then now!! as kids we were your typical siblings, we fought, never saw eye to eye and couldn’t stand each other! now as adults when we aren’t busy we are together doing something even if its just hanging out!

This moment is probably one my fav moments capture! we take a bootcamp together and this year it landed on Halloween so naturally we had to dress up!! I love this picture it makes me smile and makes me happy and makes me realize how fricken lucky I am!!

anyways that’s my inspiration for this layout, we are all inspired by something… what inspires you??

This layout was made for the Limor Webber Designs DT! For the full tutorial and full supply list head over to the blog.There you will not only find my tutorial and project but amazing inspiration from my fellow DT members, so grab a coffee, get comfy and prepared to be inspired… and maybe get a bit of shopping in!!

Thank you for stopping by! For more sneak peeks, product info and even more tutorials make sure to check out my Facebook and Instagram!

xoxo